
Project Objective
- To understand Depth of Field as a powerful creative control that manipulates the viewer’s vision to match the photographs specific conceptual content.
- Explore Emphasis and Focal Point through Depth of Field manipulation.
- Use technical skills and form to enhance content.
Project Description
In this project you are going to be focusing on using depth of field to shift the conceptual content of an image. You will be creating a triptych of IDENTICAL images using both shallow and wide depth of field.
Step-by-Step Directions
Step 1:
Set-up your camera on your tripod and shoot the same scene THREE times:
• For your first picture aim for a shallow depth of field (very little should be in focus). Your goal is to direct the viewer’s attention to the main subject.
• For your second picture aim for a wide depth of field (everything should be in focus). Use the whole frame in this photo. Everything is important in this picture. The challenge here will be controlling the scene and making sure your subject isn’t overcome by what is around it.
• For you final photo aim to go back to using a shallow depth of field, where your main subject has to be out of focus and something else in the photo has be to in focus.
Considerations:
How can you still compose a scene where your main subject is out of focus?
How does that change the conceptual content on the image? Don’t get tripped up!
Remember that depth of field is based on the image shown, not the size of the subject. For example, a macro photograph of a spider where the spider fills the frame would be a large depth of field if most of the frame was in focus even though the physical size of the subject is very small.
Step 2:
Even though the end result of your work will be three images, you will probably shoot around 60 – 90 images (20 – 30 of each scene if not more). Don’t compromise your final piece by not exercising patience and getting enough pictures! The more material you have to work with the more likely you will be able to edit your images to communicate the specific conceptual content you intended the viewer to understand.
Make sure that you are shooting in RAW if you have that option.
BE CREATIVE AND EXPERIMENTAL BUT MOST IMPORTANTLY, HAVE FUN!
Step 3:
Create a set of contact sheets with every image you shot for this assignment and upload them to yourDigital Online Portfolio under Project 3/Contact Sheets. Do not edit out your mistakes, crop, or adjust any of the images.
Step 4:
Print your contact sheets and write down the significant metadata (ISO, Shutter Speed, Aperture) next to each image. Circle the images you think are strongest to create your triptych.
Step 5:
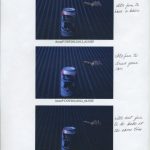
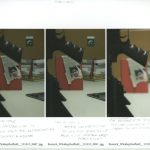
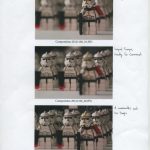
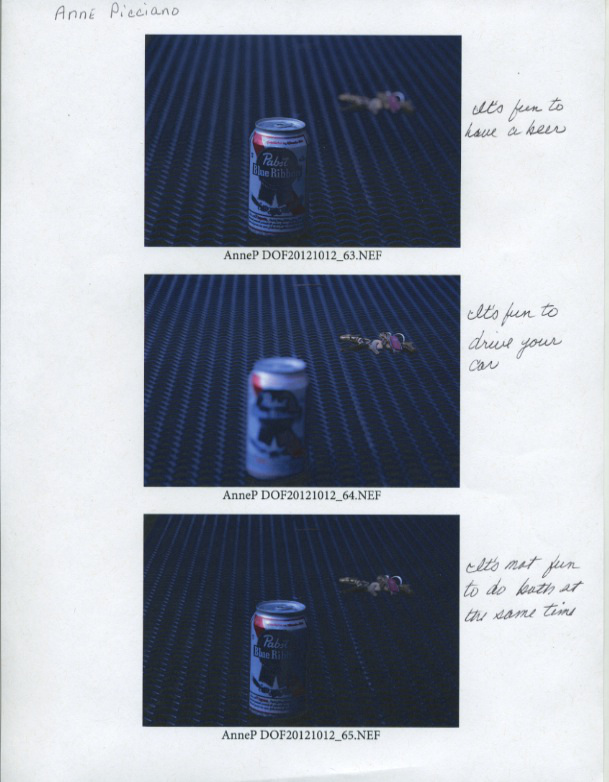
Select your three strongest images and make a new contact sheet with only your three strongest images. You will need to make the size of the jpegs larger for this second contact sheet (1 Column, 3 Rows). After your contact sheet is completed and you feel the images are appropriately scaled, type a caption sentence next to each image that demonstrates the conceptual shift from image to image due to depth of field.
Step 6:
Take some time to evaluate your artistic decisions and thoughts around this project. Grading Criteria
Final Considerations
- Did you take the same picture three times?
- Were you able to “throw” the depth of field?
- Were your captions neatly written or typed?
- Did you make the 9 contact sheets & upload them to your Online Digital Portfolio?
- Did you upload the final contact sheet?
- Do your three final photos demonstrate your understanding + application of contrast, focal point and rule of thirds?
- Do your 3 final photos conceptually explore an idea?
Grading Criteria
This project is worth 7 points
- Photographed the same scene 90 times and uploaded 10 contact sheets (2 points)
- Created a Final Contact Sheet with written captions and uploaded to portfolio (2 points)
- The 3 final photos throw the depth of field to express the content. (2 points)
- The compositions conceptually explore an idea. (1 point)
Resources
Examples
Prof. Tschampel students


